Overview
Use this method when:
-
WordPress admin upload fails
-
File is too large
-
You need more control
-
Server has FTP access only
📝 Prerequisites
-
FTP client (FileZilla, Cyberduck, or similar)
-
FTP credentials from your hosting provider
-
Extracted theme folder on your computer
Step 1: Extract the Theme Files
-
Locate
pestannihilate.zipon your computer -
Right-click → Extract All (Windows)
-
Or double-click to unzip (Mac)
-
You should see a folder named
pestannihilate
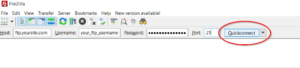
Step 2: Connect via FTP
Using FileZilla (free):
-
Open FileZilla
-
Enter your FTP credentials:
-
Host: ftp.yoursite.com or IP address
-
Username: your_ftp_username
-
Password: your_ftp_password
-
Port: 21 (default)
-
-
Click Quickconnect
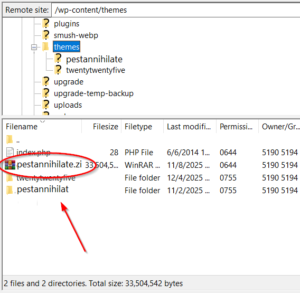
Step 3: Navigate to WordPress Themes Folder
Remote site path: /public_html/wp-content/themes/
Step 4: Upload Theme Folder
-
Left panel (Local): Navigate to extracted
pestannihilatefolder -
Right panel (Remote): Navigate to
/wp-content/themes/ -
Drag
pestannihilatefolder from left to right -
Wait for upload to complete
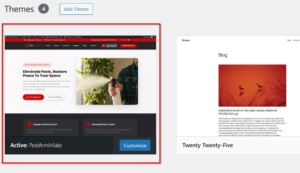
Step 6: Activate the Theme
-
Go to WordPress Admin
-
Appearance → Themes
-
Find PestAnnihilate
-
Click Activate
📊 FTP Client Comparison
| Client | Platform | Price | Best For |
|---|---|---|---|
| FileZilla | Windows/Mac/Linux | Free | Beginners |
| Cyberduck | Mac/Windows | Free | Mac users |
| Transmit | Mac | $45 | Professionals |
| WinSCP | Windows | Free | Security focus |
❗ FTP Security Tips
-
Use SFTP (port 22) when available
-
Change FTP password regularly
-
Don’t share FTP credentials
-
Use strong passwords (15+ characters)
-
Log out when finished